Sandra

farmhouse wedding decor

How to Upcycle an old typewriter new life – DIY

underwood typewriter keys

I recently found an antique Underwood No.5 typewriter that was so far gone, I couldn’t even salvage her for parts. I found her in an old barn that, well, let’s just say, it wasn’t exactly a weather-tight structure. So while it wasn’t left outside, it was pretty close. I considered using her as a planter, but two things prompted me to rethink that idea

First issue was that I left the typewriter outside, I figured it was already rusty.  But more rain made it your guessed it  rustier, and now the letter keys were illegible. So I knew that if this was to be kept outdoors, it would need some sort of topcoat to seal it and stop it from rusting anymore. It’s hard to spray poly on evenly, and I just didn’t want to deal with that. 

Type me an old letter
rusty typewriter keys

The second issue I had was that the open cavity in the typewriter would only hold one plant at best. And I was envisioning the typewriter overflowing with different types of cactus.  I love plants too much to put them in this cramped space, they won’t thrive in a space like this.

faux succulents michaels
The fix was to go with faux flowers and keeps it as an indoor decorative arrangement. Faux succulents, actually. I had found some great succulents at Michael's and was excited to get started.
diy faux succulents typewriter

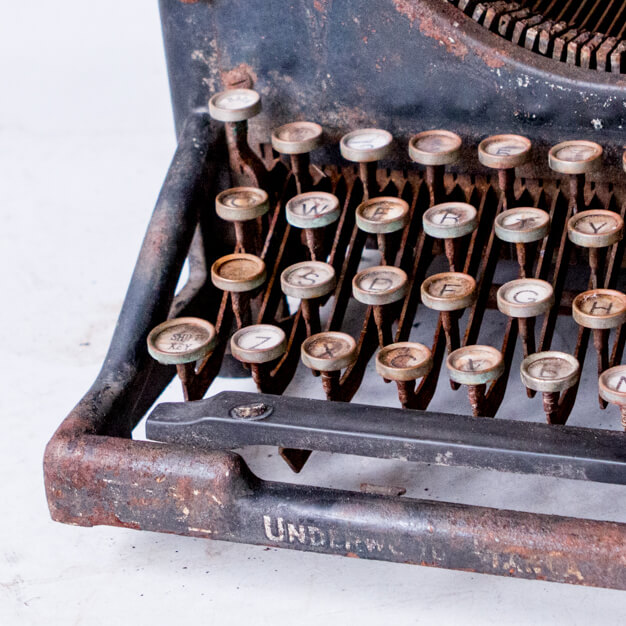
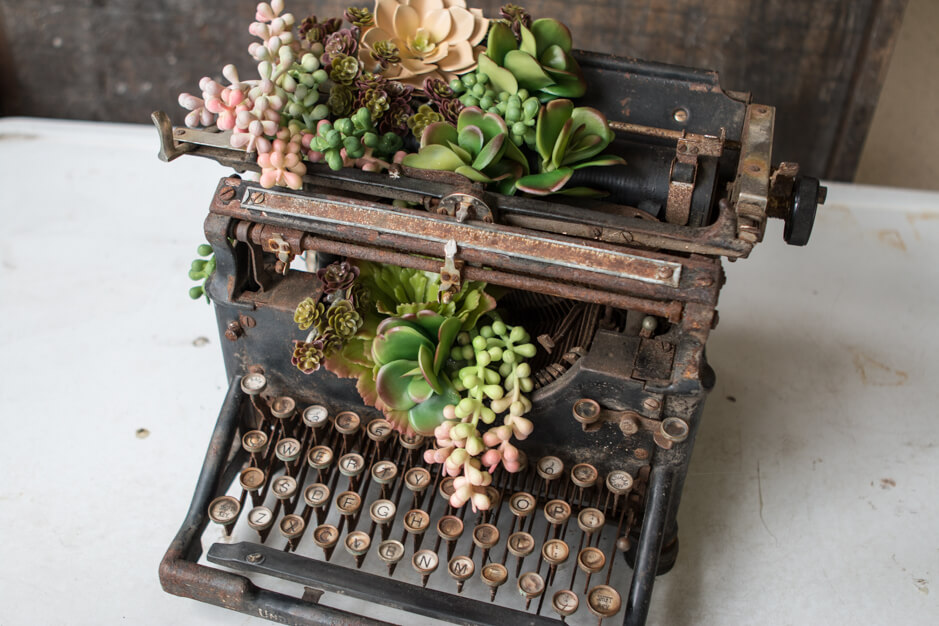
Even rusty and dirty, she is a beautiful typewriter. I mean, I don’t know about you, but when I think of an antique typewriter, I think of a No. 5 Underwood typewriter.


The Underwood typewriter was invented by German-American inventor Franz X. Wagner in 1873. In 1906, the company was bought by John T. Underwood, who changed the name from “Wagner Typewriter Company” to “Underwood Typewriter Company.

What you need:

  • 8 stems of succulents
  • Hot Glue
  • Wire clippers
  • Reindeer moss

So here is the easiest tutorial you have ever read or watched. The hardest part of this DIY was finding the typewriter. A No. 5 Underwood might be hard to find in any condition, so don’t feel you have to find the same one.


For this simple DIY, it is really just a matter of cutting the stems (in some cases pulling the tops off is easier) and gluing the faux succulents in place.


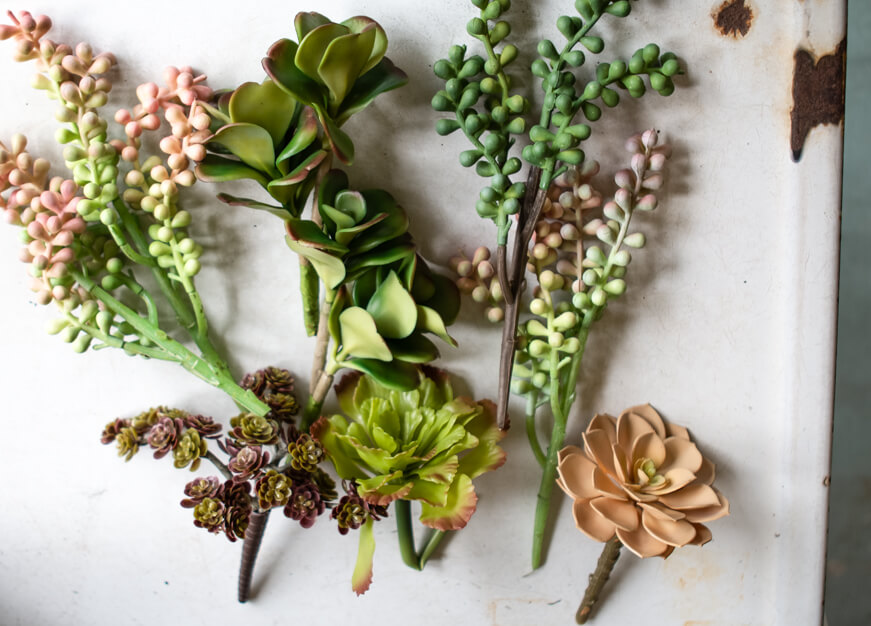
Starting with the larger succulents first, I focused on the top cavity. I also made sure to have some of the trailing succulents drape out the front and side of the typewriter.  If your typewriter is in better condition and you are concerned with damaging it with hot glue.  You could just place the stems in the cavity without gluing the stems.  That way you are not hurting the typewriter and also you could swap out the flowers with the seasons.


As an after thought, I also added reindeer moss (not shown in the pictures) it filled in any holes or mechanics that were showing.

I think this would look great on a entry table at a country or farm style wedding.  If  you really like this look and you are really ambitious, this would be a fantastic centerpiece on a table.  That would of course require you to source a lot of old typewriters, which could be a daunting task.  Or you could intermix the tables with a typewriter centerpiece and book centerpiece.  If faux isn’t your thing you could create this look with fresh flowers and that would be so beautiful as well.

I hope you enjoyed the process.  I really love how the typewriter turned out.  I have displayed on a desk in my booth and I am really happy with the transformation.

How to Upcycle an old typewriter new life – DIY Read More »

Patriotic glamour coral and brass

Celebrating the red, white and blue with vintage flair!

Patriotic glamour coral and brass

I love any reason to celebrate, but I especially love celebrating this great country on Independence Day. From bunting to tablescapes, I love to dress my house up inside and out with lots of red, white, and blue.

How Do I Incorporate Vintage Items Into My Patriotic Décor?

I do make a conscious effort to stay away from anything disposable and if I buy something new I want it to be a quality piece that will last for years.  I like my décor to have soul and whimsy. It’s not just about putting flags everywhere, but when I do you can bet that they are vintage.  It’s about finding unique accents pieces that celebrate our pride and joy.  Really highlighting the red white and blue in both conventional and unconventional ways.

Here are some decorating ideas to celebrate America's birthday in vintage style.

Americans have been decorating their homes for the 4th with flags and bunting for a long time. It’s classic and timeless and it’s where my patriotic décor begins.  When in doubt, adding some bunting to your windows and doors or hanging a gorgeous vintage flag will transform your home.

vintage patriotic decor

Do you know what direction to display the american flag?

When displaying the flag either horizontally or vertically against a wall, from a portico or in a window, the stars should be uppermost left hand corner.

A large American flag draped in the portico, bunting hanging from windows, always satisfies my soul. I am partial to using red, white, and blue scarfing fabric. Not bunting, but the long fabric.  It’s my favorite way to decorate doors and porches. It’s a classic way to dress up the outside of your home.   I recently found some vintage scarfing fabric with the most amazing patina.  I love when the white has lost some of its crispness, it gains a certain significance and presence. I realize that this is not an easy find, but you could recreate it with new patriotic scarfing and then tea stain it.  Or add to your wish list.  Do you have a vintage wish list?

Celebrate America old glory
Hanging your flag outside for 4th of july

I am always looking for beautiful old flags when I am out-picking.  I found a huge one this summer, and I love it.  It’s well-loved but not ragged or worn.  For me, a good flag is made of cotton, has some weight to it, but is still vibrant.   Although I can appreciate a faded flag, I like prefer strong colors in my flags.

I think we traditionally think of patriotic décor to be an “outside” thing. However, don’t neglect the inside of your home. 

Vintage Patriotic Indoor Décor Ideas

I can not pass up vintage flags, and I have been picking for a long time. As you can imagine, I have amassed quite a collection. I like to display them collectively in old cider bottles or vintage metal cans.

Old Falls City bait can filled with vintage flags
Celebrate summer with vintage patriotic
Vintage cider jar filled with vintage flags.

I collect flags on sticks, but I also collect sad flags that have lost their stake. So often found in the garage or basement of homes in forgotten boxes or drawers. I love them. They have a great patina.

I recently found an old, weathered sailboat mast. I clipped on all the loose flags with tiny red clothespins, and I think it looks fabulous! You could also clip the flags on some string and make a banner for your mantle or wall.

Old sail boat mast with vintage flag clipped on with red clothes pins.

Vintage Patriotic Vignettes


Find spaces in your home where you can celebrate the season, whether it’s Easter or, in this case, 4th of July. Having an area to switch out with themed décor is a great way to decorate without overwhelming you or your space. My hall table always has a stack of vintage red books. For the 4th, I add some blue vintage books and vintage trophies and filled  them with white hydrangea. It doesn’t take a lot to change the space. You could add a picture frame with a vintage patriotic print.  I recently found this beautiful patriotic cross stitch that look great in this vignette.

Vintage Trophies with cross stitch

Patriotic pottery vignette


Chinasoire pottery lends itself beautifully to patriotic décor. If you collect flow blue or blue and white pottery, adding some red flowers to your display will make for a beautiful vignette. The best part of this look is that you just embellishing décor that you already have.

My collection of blue and white pottery accented with faux red hydrangea.

Utilizing color in you patriotic décor


I like to  make use of things for their color and often ignore what they are. For example, I use vintage books as décor. Stacking vintage red and blue books with a small vase of white hydrangea is a classic look, with patriotic flair.  It doesn’t always have to be about flags and bunting.  

Red, white and blue can be achieved with fruit, flowers, books, paper, fabric, and baked goods. You can add faux fruit to a blue and white ironware bowl for a stunning look on your kitchen counter.  Red gingham napkins on a blue plate can elevate your tablescape.  

Repurposed Pickle Crock turned into a side table
Red White and Blue Christmas ornaments

Another thing that I collect are vintage glass Christmas ornaments.  I collect all sizes and I use the small ones in bowl for different holidays.  Above is a grouping of red, silver and blue mini glass ball ornaments in a cut crystal pedestal bowl.  I love how they are sparkly and pretty.   It’s vintage, it’s patriotic and it’s a different take on glass ornaments.

I hope you found some inspiring ways to celebrate America with vintage flair and style. 

Celebrating the red, white and blue with vintage flair! Read More »

Spring hellebores purple and flower frogs

Bringing Spring Inside -How to incorporate vintage and antique items into your Spring home decor?

How Do I decorate my home for Spring with vintage and antique items?

I do it with flowering branches, plants, and natural elements like nests and baskets.  Fill in any bare spots around your home using plants, flowers–anything green really!  I love that juxtaposition of the old and new. I use my collection of vintage and antique vases and vessels to showcase the beauty of spring.  

st patricks day arrangement

As I get to the end of February, I am over and done with Winter. Unfortunately, living in New England, there is still a lot of Winter left. So I cope by bringing the feeling of Spring inside.

Vintage trophy with forced pink branches

Forced branches and bulbs in Vintage Vases and Urns

I usually start at the end of February/beginning of March by incorporating forced branches and forced bulbs, and by the end of the month, the Easter eggs and bunnies start coming out. I enjoy using natural items like nests, moss, flowers, and I will usually buy a Spring candle to burn. Right now, I am enjoying the Thymes Olive Leaf candle. (The Thymes Fraiser Fir is my all-time favorite candle.) It’s a lovely clean scent which is what I want in the Spring.

pussy willow in vintage brass vase with vintage clock

I also try to keep a natural palette so you won’t find a lot of jarring bright colors in my home.  This year I find myself gravitating towards mossy greens and creams, but it changes every year.  This year I celebrated Spring with this beautiful tallow berry wreath.  If you would like to see how I made it you can find the tutorial here.

tallow berry spring wreath idea

I have nothing against faux flowers. I use them all the time. Especially in my booth, it’s a low maintenance way to bring color and texture to my space. I am usually there once a week to replenish and revamp, so fresh flowers are not an option. In general though, I always prefer natural items like the tallow berry branches or pepper berry is another favorite that has excellent color. Did you know that they bleach and die them? So you can get them in a gorgeous creamy white as well. I have worked as a florist for many years, and I never knew that they came in different colors. That is another wreath I hope to make in the fall, so stay tuned for that


Kitchen flowers spring
spring vase arrangement hellebores cream and green flowers

Planting spring flowers in unique Vintage planters

The kitchen is the heart of our home, and I always have fresh flowers by my kitchen sink. So this space changes weekly. I will usually start in February with a vase full of pussy willow, then move to tulips and daffodils. It’s constantly changing and always reflecting the season. Lately, I have also been incorporating potted flowering plants, like this Hellebores (which I hope to plant in my garden) that I purchase at Wegmans of all places. I planted it in this beautiful copper pail that I found at a local estate sale.

growing wheat grass

Forcing Wheat Grass in vintage baskets

Earlier I mention my obsession with hunter green and green.  In keeping with the green theme, this year I tried something new. I have had a bag of wheatgrass seeds sitting under my kitchen sink for two years now, waiting to be sowed for spring décor, and finally, this year, I sowed some seeds. In these drab months of Winter, I crave all things green because the color conveys a feeling of life to me. I planted up a few containers this year, but my favorite was this 50’s gold metal basket. 

This basket came in an auction box lot, and it was full of moldy Christmas greens (I wish I had a before photo). I was tempted to just throw it all out, but the form was so beautiful. I know I could give this basket new life.

Wheat grass spring centerpiece

I also planted a few other containers with wheatgrass and used them in my Easter décor. Here I planted vintage desert cup with wheat grass.  You can read more about my experience growing wheatgrass for décor here. It was a good experience, but I am not sure I will do it again.

vintage flower frog collections

I love to juxtapose vintage items with flowers and plants. In this vignette I have a beautiful vintage (almost antique) trophy, my collection of flower frogs on a large silver tray.  This 1922 trophy showcases these purple Hellebores gloriously. My dad had given me a plant a few years back, and I planted it, but I don’t think it likes its location because I’m lucky to get 3 or 4 blossoms.  So I end up stealing them from my parents’ garden every year.

purple spring flowers
deconstructed purple flower silver dish

These Ranunculus were from my Easter centerpiece. They are one of my favorite flowers ever and I try to enjoy every last bit of them.  Once I see that they are starting to die, the stem will start to shrivel, but I like to pop the head off the stem and float it in some water. By doing this I can usually get an extra  2 days from the bloom, and I enjoy displaying them in this unconventional way.

They look so sweet floating in this vintage silver plated butter dish.

These are some ways that I decorate my home for Spring with vintage and antique items.

How do you incorporate your vintage and antique items in your Spring décor?

Bringing Spring Inside -How to incorporate vintage and antique items into your Spring home decor? Read More »

Spring wreath green white

How To Make A Spring Tallow Berry Wreath – Tutorial

Happy Spring! Are you searching for new unique Spring wreath ideas?

Nothing says welcome to Spring like a pretty spring wreath on your front door or in your home. If you’re looking for a modern and classic spring wreath design, you will love this tallow berry wreath.

Spring Tallow Berry Wreath Tutorial Video

You can watch the video to see how I made this wreath. I started with a 8″ grapevine base that I purchased at the dollar store. (You can make this wreath in any size, but you will need more tallow berry for this full look). The finished wreath is 11″ in diameter so that the berries will bring a lot of volume to your wreath size. This wreath took 4 bunches of tallow berry to complete

grapevine wreath base tallow berry spring wreath idea

Once you have completed the wreath, you can either keep it simple or add ribbon.  If you do not want to add ribbon, you can add some wire to the back to hang the wreath.

tallow berry spring wreath idea

Typically I wouldn’t say I like bows on wreaths, but I do love a good ribbon. For this wreath, I opted to use a mossy green ribbon to bring out the green in the wreath and also as a way to hang the wreath. To use the ribbon method, flip the wreath over and slip one end of the ribbon through the grapevine and then do the same with the other end.

tallow berry wreath idea

I kept 3″ of ribbon at the top of the wreath, and made sure the streamers were even.  When you find the length you like, tie each side in a knot to hold the ribbon in place.  Then flip the wreath over and pull the ribbon streamers through the center of the wreath, finish the ribbon by cutting, folding the streamers in half, and cutting a triangle from the outside bottom edge to the top.  Then flip the wreath over and pull the ribbon streamers through the center of the wreath, finish the ribbon by cutting, folding the streamers in half, and cutting a triangle from the outside bottom edge to the top. 

tallow berry spring wreath idea

I also covered the back of the wreath with more reindeer moss. You could leave it, but covering the mechanics gives it a finished look. Also, if you decide to hang the wreath on a glass door or window where you would see both sides, you need to cover the mechanics. Here you can see what the finished back. Now I think it looks great from both sides.

tallow berry spring wreath ideas
tallow berry spring wreath idea

If this wreath is kept out of the elements, it will last for years and years. So no direct sunlight, moisture or heat.  I hope you enjoy making this wreath as much as I did. Please tag me in photos of your wreath, I would love to see them.

How To Make A Spring Tallow Berry Wreath – Tutorial Read More »

How to use a glass floral frog – Tulip Centerpiece

Vintage flower frogs are one of my favorite tools to use when creating floral arrangements. They became very popular in the early 1900’s, but they have been used for hundreds of years in floral design. They are still being manufactured today, but nothing beats the patina of a vintage flower frog. I was once in line checking out at an estate sale and happened to find a couple of flower frogs, the woman behind me commented, “flower frogs are worth their weight in gold,” and I couldn’t agree with her more.

grouping of glass flower frogs

Why use a flower frog?

Mechanics are essential in any good floral design, and flower frogs provide a designer with the essential support that stems need in arrangements.  There are a few ways to do this, but flower frogs offer an eco-friendly way to floral design.  They are growing in popularity again as an alternative to the popular floral foam.  When floral foam first came out in the late fifties, it was the answer to every designer’s dreams.  It holds a lot of water, provides stem support, made transporting a dream, and flowers can last in foam for over a week.  


The problem is that floral foam is essentially plastic that is treated with detergents. It is not biodegradable, and as it breaks down, it does so as tiny particles that contribute to the world’s microplastic problem. You are here to learn about vintage flower frogs,  but I urge you to research the environmental impact that floral foam has on the environment and consider other alternatives.

collection flower frogs glass metal

Finding the right fit and material

Flower frogs come in all shapes and sizes, from metal to glass and ceramic. They made elaborate flower frogs in beautiful shapes and designs during Victorian times, but I think those really are only good to showcase one flower or a few stems. Metal pin frogs and glass frogs are the easiest to find and can often be found at flea markets and antique markets.


Ceramic and glass frogs with large holes lend themselves to flowers with thicker and Or Sturdy stems, like tulips and stock or woody stems like lilacs. 


In comparison, metal pin frogs are great for thinner stems and a more structural design. Metal pin frog, called Kenzan frogs used in the Japanese floral design style, called Ikebana, provide the support needed for this very architectural style of floral design. Personally, I love the control that it gives me in my designs, especially in today’s airy designs.  


For this arrangement, I am using a beautiful Grecian-style urn with a very wide mouth.  The vase requires some sort of support mechanism to hold the flowers in place. While it’s technically possible to create the arrangement without any support, doing so would require a large quantity of flowers and result in a somewhat bulky appearance. To keep the focus on the flowers themselves, I’ve decided to use a glass flower frog as a support system.   It will support the this stems of the tulips perfectly and will blend in beautifully in the vase and will hardly be noticeable.

Vintage glass flower frog
Some say the name comes from the fact that the frog sits at the bottom of the vase like a real frog is often found sitting in water.

If you don’t have a flower frog, you have other options. You can also use curly willow stems to form a base in your vase, chicken wire, or tape the top of your vase to support your stems.

close up glass flower frog mechanics

This frog measures 5″ and has 16 holes, just enough for the perfect foundation. To begin the arrangement, I fill each of the holes with one tulip stem. Once I have filled all the holes with stems, I fill all the empty space in the arrangement with the remaining flowers. This arrangement has 60 stems of tulips (thank you, Trader Joe’s), which is a lot but the arrangement is light and airy.

How To Design With A Glass Flower Frog

The visual learner that I am thought a video would be a good idea.  So I shot a quick YouTube video showing you how I created this tulip arrangement.  

The result is a beautiful clean, structured but airy, modern design. As you will see it’s not as intimidating as you thought it might be.  The hardest part would finding the right size frog for the right size vase.

Tulip centerpiece trader joes flowers glass frog

Collecting Vintage Floral Frogs

I hope that this inspires you to try an arrangement with a flower frog. And maybe it will also encourage you to start your own collection. They still have plenty of use in them and are inexpensive to collect. You can find vintage frogs anywhere from $5-20, depending on the size. I use them for flowers, but I also use them for photos and cards. It’s a great way to display small signs or table numbers. Some people use glass frogs for pens, brushes, and even scissors.

repurpose vintage flower frogs holding cards
vintage green metal flower frog with picture

My collection is growing and consists of various types of frogs.  I shared about my collection in a blog post, if you are interested you can check that out here.  Though I have quite a few frog it’s still fun an exhilarating to find flower frogs especially the rare and unique ones. 

How to use a glass floral frog – Tulip Centerpiece Read More »

Pronouncing The Name – Vintage Bu-Te

Vin·tuhj - b·uu·tee

 Oh, that’s how you pronounce your name, is what I usually hear when I explain how to say the name of my company. It almost always needs an explanation. I thought it was pretty straightforward, but changing how a common word is spelled throws the human brain for a loop.

I wasn’t trying to be creative with the spelling of beauty. The truth was Vintagebeauty.com was already taken. I’m sure I could have bought it for a price, but I wasn’t willing to do that.

I am always a little self-conscious when I have to explain the name, but I love the name. It embodies what my company/brand stands for, which is showcasing, highlighting, and celebrating the past’s beauty.


If someone asked you what google was in 1990, you would be dumbfounded and probably struggled to pronounce it. Look at it now. What is life without Google?

I love vintage/antiques, not because I think old things are better. Amazing things are being designed and made today. I am fully present, and I am grateful to be alive today. I love all of life’s modern conveniences.

What I don’t like is the throwaway culture of today—the dollar store mentality. Nothing brings warmth to a space like a beautiful vintage handmade rug; I appreciate the craftsmanship and the design, whether the item was created in 1875 or 2020. There is room for both.


Truth be told, true beauty stands the test of time. 

You may need to frame it differently, but a beautiful piece of cut glass from the ’20s is just beautiful today.

If I do my job correctly, Vintage Bu-Te Antiques will one day not need an explanation.

So here’s to a future where the name Vintage Bu-Te no longer needs clarification.

I would love to invite you to visit my booth. I have one booth now located at the Cambridge Antique Market, located on the main level, booth #22. I hope you can find some time to come out and visit real soon. There are so many treasures to be found there. Not just in my booth but the entire building. It’s five floors of fantastic dealers and unique treasures!

See you soon!

Pronouncing The Name – Vintage Bu-Te Read More »

Forcing amaryllis Bulbs inside – Amaryllis love in full bloom

There have been a few good things that have come out of the Covid pandemic.  It has forced us, specifically me, to slow down.   As a wife, mother of 3, part-time marketing and manager, and small business owner, I am always super busy.  Covid has changed all of that significantly, and while I am still busy, I find myself with more time to do what has been on my to-do list forever.

On that list was to force amaryllis in the winter, and I finally did it after a little YouTube inspiration.  Two channels I especially love are Garden Answer and The Impatient Gardner. They have fantastic tips and information if you are looking to grow amaryllis yourself.  I had no idea how many varieties there were, and they are all just so glorious

Being in the antique business, I always come across unique pieces that can be used planters. I was eager to use some of these pieces to grow these beautiful flowers.    

I recently purchased this large vintage brass bowl (I’ve been a little obsessed with brass lately) at an estate sale.  It measures 14″ in diameter and is 6″ high.  Initially, I had no idea what I would use it for, but I loved the size and the patina.  Amaryllis were fresh on my mind after watch Laura from Garden Answers and was happy to find some on clearance at my local Walmart.  I thought they would look amazing in the vintage brass bowl and they did not disappoint.

Timing is everything when planting these bulbs.  It would be best if you planted them in October for December Bloom.   I did not stick to that timeline and planted some in mid November and a couple in early December.  It all worked out because then I have staggered bloom time.

I’m so happy with them. It’s been gratifying to grow these beautiful flowers, especially to pair them with beautiful pots and planters.

Now the challenge is can I get them to rebloom?


Forcing amaryllis Bulbs inside – Amaryllis love in full bloom Read More »

My top 5 vintage finds of 2020

2020 started off amazing, and when I think back to January of 2020, I remember being so excited.   I had just opened my both in October of 2019, and things were going well.  I was making my rent plus a little more (not much).  It was a great start things were going really well, and then, the world shut down.

The co-op was closed for almost 4 months!  I wasn’t sure what was going to happen.  In June, the co-op opened up again (thank. God!).  Estate sales began again, and the thrift stores were opening up (I missed picking for treasures so much), and I could finally exhale. 

As crazy of a year as it was, there were still fabulous finds. These are my top 5 finds of 2020

NO. 1 Matching pair of marble lamps

I was in line checking out at Savers, and there were these two matching marble lamps! 2! (Did I mention they were matching.) They were sitting on an empty check out table. So asked if they were available. Turns out a woman that was checking out had just passed on them. I was screaming inside. She didn’t want to let them go, but she said she didn’t have a place for them.

NO. 2 Large Quartz Rock
 

It was one of the first estate sales that I went to after things started to open up. This house was a hoarder’s house for sure, but these folks had excellent taste. I found many things, but this beauty was my favorite.  I found it in the garden, being used as an accent rock! As you can imagine, it was pretty dirty, but I was happy to score it for $5! I tried to wash out all the dirt but couldn’t get it clean. I tried a dish brush, a toothbrush, nothing worked.  So I ran it through the dishwasher, and that did the trick. I have it on a side table that I created out of an antique pickle crock. It sits next to the marble lamp. And the colors are just perfect.  Lately, I have been gravitating to these natural tones. 

NO. 3  Antique console table
 

I bought this table through an online auction. Online auctions are always a gamble because the pictures never do the items justice. A few auctions houses do a good job, but most are just quick photos with measurements. This gamble paid off. The table was everything I was hoping it would be in person.  

This table is the stuff that Restoration Hardware copies. Look at those legs and the dark wood. There was an old cup mark on the top of the table that wasn’t disclosed, but otherwise, it is just glorious. And the cup mark well that’s nothing a strategically place items can’t hide.

No. 4 Pink Merino Wool Blanket

I found a matching pair of twin-sized pink wool blankets. They were $15 each, and they were in perfect condition. The prettiest shade of baby pink and I don’t think they were ever used. The label reads John Atkinson – Made In England, 100% percent merino wool. I had no idea how expensive these blankets were, but now I understand why.

My husband hates using a lot of blankets, and I can never have enough. So the twin size worked out perfectly because I could keep it only on my side. I have never owned a wool blanket before and not sure I will ever go back. What a luxury.

NO. 5 Barn ladder

Again another online auction with mediocre pictures and a bit of a gamble, but I was thrilled when I picked up this old barn ladder. It was $65, a little more than I wanted to spend, but I’m a sucker for all the crackly goodness. It is made of a split log, and unlike most of the ones you find online, you could actually climb it. After giving the rungs a good scrubbing it was ready to hold towels in my bathroom. 

As difficult as this year was, there were still many bright points.  I hope that you were able to find some amazing treasures.  Happy New Year!

My top 5 vintage finds of 2020 Read More »

Collecting Vintage Christmas Ornaments

I have a list of things I always look for when I am out picking. And Christmas is number one on my list. My love for vintage Christmas is so big, vintage Santa’s and hand-made stockings, oh and vintage Christmas cards! It’s always a magical day when I find vintage Christmas, but what I love most are antique glass ornaments.

Germany is famous for its glass ornaments, and many consider it the birthplace of glass ornaments, but Poland and Japan also made beautiful coveted glass ornaments.

During the early 1900’s America became the biggest importer of glass ornaments. At least it was until WWII, which resulted in a ban on German goods. With necessity being the mother of invention, a German immigrant named Max Eckardt used the Cornings E-Machine technology (used to make glass light bulbs) and perfected the production of glass Christmas ornaments. They were able to mass-produce glass ornaments, and Shiney Brite was born.

I don’t have a preference. German, Japanese, American, I just love the fragileness of the glass, the muted colors, and the crackle in the paint. Even though the colors may be muted, there is still so much life in these ornaments.  And nothing says Christmas like a silver bowl full of vintage red glass ornaments. The various shades, shapes and sizes. It’s one of my favorite things—each one unique, with its own patina.

To me nothing says Christmas like a silver bowl full of vintage red glass ornaments. All different shapes and shades.  It’s one of my favorite things—each one unique, with its unique patina.  

Over the last few years, I have opted for a bare tree with just lights.  I have found that I prefer to enjoy my ornaments in bowls and jars.  I can group colors and styles together, and I feel like they have more of an impact.

how to clean Vintage christmas ornaments?

I learned to be VERY carful when cleaning the ornaments.  Be sure to spot test.  

My advice, don’t use soap or cleaners.  Only use water and use it sparingly.  In the past I have accidentally washed all off the paint with dish soap.  If you do end up removing the paint, the beautiful mercury glass underneath was pretty lovely as well so it’s not a total loss.  

Not as bad as dropping a 70 year old ornament on the floor.  Which has happened way to too many times!!!!

My score of the year, are these lovely glass ornaments in pastel yellow and green; they are just so delicate and sweet.   Not traditional Christmas colors, but really beautiful.  I bought these back in August!  And while I didn’t forget about them, when I opened the box last week,  it was just as lovely as the first time.

I hope you have enjoyed seeing some of my collection.  Happy hunting!

Collecting Vintage Christmas Ornaments Read More »

strawberry vanilla hydrangea end of summer color

Strawberry Vanilla Hydrangeas perfectly Paired

I have always been a fan of Hydrangeas.  And I have many types growing in my garden.  My favorite are my Strawberry Vanilla hydrangeas, they were a gift from my dad.  He has since passed but they hydrangeas remain a constant reminder of our shared love of gardening and flowers.

Every year they put on the most amazing show.  Lime green in the spring, creamy white in the peak days of summer and then they really turn it on come late August, September.  They start to turn a beautiful creamy, mauvy pink and I just love them.  

vintage pitcher with crazing
vintage ironstone crazing
end of summer strawberries cream hydrangea

When I found this beautiful ELPCO pitcher I knew just what to put in it.  Actually it didn’t need to put anything in it, because it was so lovely on it’s own.   You have to admit that these two are perfectly paired.

Strawberry Vanilla Hydrangeas perfectly Paired Read More »